The Complete Guide to Foam Rolling
Hey Angels and Alphas!
You’ve probably heard a lot about foam rolling from fitness experts, athletes, coaches, therapists, chiropractors, rehabilitators, and to be honest, from pretty much everyone nowadays.
It’s true – foam rolling has gone mainstream. But I’m happy it did.
Once, it was just a self-massage technique used only by top athletes and health practitioners.
Today, most people who step inside a gym have tried it at least once, and it’s one of the most popular forms of self-manual therapy. Without a doubt, there’s a reason for that.
Foam rollers are now available in most commercial gyms, and these nearly-magical cylinders come in all sizes, designs, and firmness levels.
The reason for the increasing popularity of foam rolling is this: it’s simple, and it works!
What exactly is foam rolling, and how does it work?
Foam rolling is a form of self-myofascial release.
The fascia is a thin layer of connective tissue that wraps around and connects our muscles. It essentially helps individual muscle groups act and cooperate as one integrated unit.
If your fascia is healthy, it’s soft and flexible, and it smoothly glides over your muscles, allowing them to move freely.
But if your fascia isn’t healthy, it’s stiff, rigid, and inflexible. It diminishes movement and motion and feels crammed up around your muscles. This can happen for a variety of reasons – sitting at a desk all day (or just being generally inactive), disease, physical trauma, inflammation, injuries, and so on.
This is where your foam roller comes in to save the day.
The foam roller is a cylinder made of foam or flexible plastic materials. It’s mostly a device used for massaging. As I mentioned above, it comes in a variety of sizes and textures with different firmness/softness levels.
You use your foam roller by laying on it in different positions, allowing the weight of your body to put pressure on your focus muscle group (which we’ll talk about later). You can foam roll for your quads, glutes, hamstrings, back, hips, you get the idea. This “rolling over” causes a release of built-up tension in the fascia around the target muscles, leading to the soothing of tightness and soreness.
To put it short – foam rolling is the act of using a foam roller to “self-massage” and release tension from areas of your body that are stiff, inflexible, and sore (often referred to as muscle knots). Experts believe this occurs because the foam roller allows the fascia to stretch and increases the blood flow to the muscles, alleviating these tissue adhesions. This is one of the keys to the healthy fascia!
Why Should You Add Foam Rolling To Your Workout Routine?
Foam rolling has found its place in discussions about flexibility, performance, recovery, and injury prevention.
Let’s look at each of these individually, so we get a clear picture of all the benefits of foam rolling!
- Boosting your performance and flexibility.
That’s because getting rid of these soft tissue adhesions helps you move more naturally. And let’s not forget, removing all of the lactic acid built up in your body allows you to really improve your posture. By improving your posture along your joint range of motion, your muscles will, of course, function better during exercise.
Because foam rolling has a lot to do with releasing the tension from your “muscle knots”, it helps you reestablish your proper patterns of movements. Since stretching can’t help with that to the full extent, foam rollers are the next best thing.
Several studies also conclude that foam rolling helps you with both your short-term and your long-term flexibility. In the short term, your flexibility improves for a whopping 10 minutes (yes, a little underwhelming). However, to reap all the long-term flexibility benefits of foam rolling, all you have to do is to make a habit of it and do a little bit every day. (Set length doesn’t matter in the long-run).
- Speeding up your recovery.
While you’re working out, your body produces lactic acid. If it isn’t removed and relieved, it sits in your muscles, creating what you’d call DOMS (delayed-onset-muscle-soreness). It’s that lactic acid that makes you feel in pain the day after a big workout.
By foam rolling after an intense workout, you improve the circulation of blood to your muscles, basically “flushing out” lactic acid and allowing your muscles to repair more quickly and without pain!
- Preventing injuries.
If you experience a lot of pain while you work out, or even if you’re just going to the gym every day and not getting enough rest, chances are you’re at risk of injury.
If you’ve felt this pain and done nothing about it, you might have too much stress accumulated in that muscle group and you should definitely make an effort to release it.
With foam rolling, you can ease your overworked muscles and relieve the long-term accumulated pressure that might be the underlining cause of your workout pain.
With it, you’re essentially balancing out the tension in your body, minimizing your risk of injury.
A quick note about upper spinal mobility;
Your upper spine can tremendously benefit from foam rolling!
I’ve met a lot of people who experience chronic tension in their neck, shoulders, and back. This is the type of pressure that leads to pain and bad posture. Foam rolling works wonders for your upper spinal mobility and loosens up the tissues.
For some of you out there, it might be the miracle remedy for your back pain/neck stiffness. Keeping that in mind, I always suggest going to smaller messaging devices (even a tennis ball works) when you’re targeting your neck.
When Should You Foam Roll?
Now, I want to quickly go over the before / after workout foam rolling discussion.
The overall objective of foam rolling is to break down the excessive stiffness that impedes your muscle and joint movements.
For that exact reason, it’s illogical that you would foam roll before a strength training workout. If you’re an athlete who trains at a high intensity using resistance training (like powerlifters and bodybuilders), you’re essentially using your muscle fibers along with all the tightness in them to generate force.
If your quads are all loose and wobbly, you’re most likely not going to be hitting a new PR today.
Breaking down the muscle tissue when you need it to perform makes no sense.
Instead, save foam rolling for after your workout. This way, you can focus on the major muscles groups you worked out (along with any problematic areas), stimulate the blood flow toward those areas, and aid the entire recovery process.
However, some experts out there do claim that relaxing tense muscles is best done before a workout because it stimulates blood flow to the muscles.
I’ll just let you make your own decision based on what I just told you.
How Do We Foam Roll The Right Way?
Down below, I have listed the most popular foam rolling positions. Every position has a specific target area from which you’re alleviating tension.
Keeping that in mind, here are a few general foam rolling tips before we start;
- To foam roll the right way, you apply moderate pressure to a specific muscle group using your bodyweight.
- It’s better to be too soft than too hard.
- You should roll slowly.
- If there’s an area that’s too tight (and hurts when you roll over it), pause for 15 seconds, relax as much as possible, and try again. You’ll slowly start to feel the muscle releasing.
- If that area is still too painful, switch up your position and apply pressure to the surrounding regions to gradually loosen up the entire body section.
- Do not roll over joints, bones, or your stomach.
Okay, we got the main concepts out of the way, so now let’s see how to perform a correct foam roll for each major body position!
To keep it simple, I like to divide muscle groups into three parts – bottom, middle, and top.
In your foam rolling routine, make sure you do at least one roll for each of the three.
- The Upper Back Position (Thoracic Spine);
First, let your back rest against the floor. Have the foam roller positioned underneath your two shoulder blades. From this position, bend your knees, so your feet stand flat on the floor. Place your hands behind your head, and start rolling back and forth.
When rolling, engage your core muscles and slowly raise your hips off the floor. Here, the foam roller should be moving up and down between the top of your shoulder blades and the middle of your back. Keep in mind to ONLY go as low as the middle back, and keep your neck at a neutral position at all times.
- The Middle/Lower Back Position (The Latissimus Dorsi);
Lie down on the floor on your left side. With your left arm extended, place your foam roller directly under your left armpit. If you do it right, the cylinder should be perpendicular to your body. Then, bend your right arm and place your right hand on the floor for balance.
When rolling, roll up and down, so the foam roller moves from your armpit to a point slightly above your waist.
When you’re finished, repeat on the right side.
- The Lat Position;
Lie down on your right side. Right arm pointed up and away from your body. Place the foam roller under your armpit, just under your side.
When rolling, start with your legs bent and push your body up and down the roller to hit the lat muscle accurately.
You can place your arms on the ground or keep them elevated, just make sure the majority of your weight is on the foam roller. The movement of the foam roller here is from the lower part of your lat back to your armpit.
- The Pectoral Position;
Lie flat on the floor with your tummy facing down and your arms on your sides. Slide your roller under your left arm, plant your right hand firmly on the ground at a 90-degree angle, and push yourself so that your body goes up and over the roller.
When rolling, use your right arm for leverage and support, and roll your body back and forth so that your foam roller is moving from the outer parts of your chest into the center of the chest in a diagonal manner. Switch sides and repeat.
- The Shoulder/Rotator Cuff Position;
Lie down on your left side. Hold your left arm up above your head. Slide the foam roller under your armpit. Keep your left leg straight and extended, and your right leg bent for balance.
When rolling, rotate your body from your side to your back. Here, you’re not trying to apply too much pressure, you’re just trying to turn as much as you comfortably can.
- The Biceps & Triceps Position;
Lie down on your left side and bend your legs. Hold out your left arm and set your foam roller so that it’s directly under the middle of your upper arm. Then, place your right hand on the floor in front of your torso and use it for support.
When rolling, use your legs to roll back and forth so that your foam roller is moving from your armpit area up to your elbow. Use both your legs and the arm you use to support yourself with to shift the pressure on and off.
For biceps, keep your biceps resting on the foam roller. For triceps, rotate your arm so that your palm faces the ceiling and the foam roller is rolling only on your triceps.
- The Quadriceps Position;
Lie face-down on the ground with the roller positioned under your thighs. Bend your elbows and place your forearms flat on the floor (to support your weight).
When rolling, engage your core muscles and keep them drawn in. Use your arms to just slightly push your body forward and back.
The movement of the foam roller here is from your pelvic floor to a point just above your knees.
- The Glutes Position;
Sit on top of the foam roller. (Place it under your “sitting bones”). Cross your left ankle over your right thigh, and plant the right foot firmly on the ground. Lean back so that your hands are supporting a little bit of your weight.
When rolling, angle your body in different directions so that you move your glutes up and down across the foam roller.
Do each side for up to a minute, and apply more pressure when you feel a trigger point or area of pain.
- The IT (Iliotibial) Band Position;
Start off by laying on your left side. Your body should be fully extended, and your foam roller placed under the outer side of your left leg. (Below the hip bone).
Use your left forearm as the base for your body, and bring your right leg up, placing it in front of your left leg. With your left leg still fully extended, lift your left foot off the floor so that your body has to balance on its side (on top of the roller).
When rolling, roll up and down your leg from the top of your hip to the bottom of your knee.
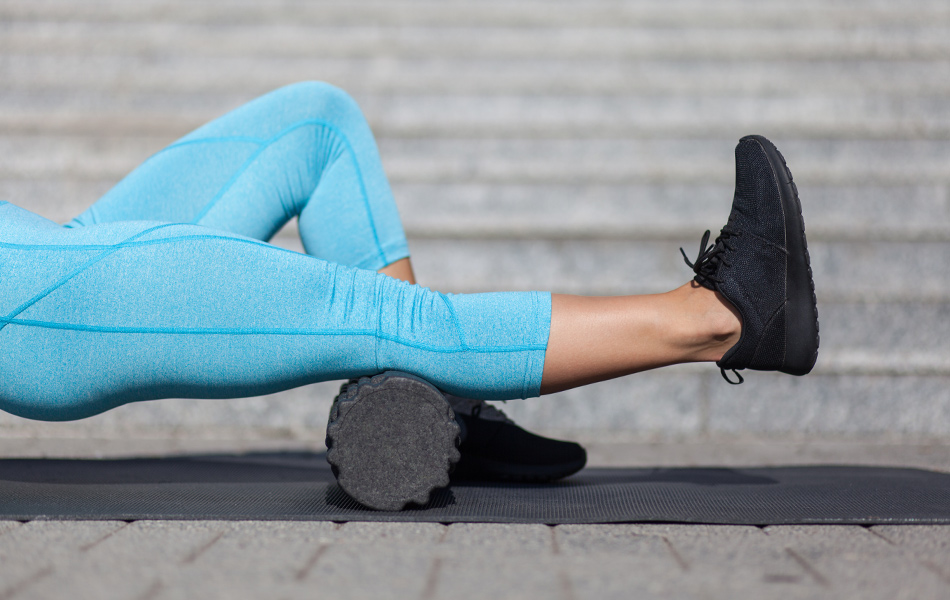
- The Hamstring Position;
Sit with your legs extended in front of you, the foam roller placed under your thigh, and your hands supporting you on the floor behind you. (You should be a little bit off the ground).
When rolling, use your arms to initiate a pushing motion and slowly roll back and forth. The movement of the foam roller here is from your knee to the bottom of your glutes.
- The Calves Position;
Sit on the floor with the foam roller underneath your calves. Once again, put your hands behind you for support.
When rolling, slowly roll forward and back and move the foam roller from your knees to your ankles. You can even cross one leg over the other to put more pressure on it and do them one at a time.
- The Hip Flexors Position;
Start in the prone position, resting on your hands and feet with your tummy facing the ground. Put the foam roller beneath your quads, while your elbows are positioned just above your shoulders. Sort of like when you see people jump with a parachute, but with your hands in legs around shoulder-width apart.
When rolling, simply shift your weight forward, bring your shoulders in front of your hands, and the foam roller will move from your quads to your hip flexors. Be careful and don’t roll onto your knees.
*For smaller trigger points such as your neck, skip the foam roller and grab a smaller massaging device.
To Conclude!
Roll, roll, roll with it!
There is a reason foam rolling has become so popular, and hopefully, you now understand why.
It’s not only a must in nowadays physical therapy and rehabilitation, but it’s also a powerful way to relax your mental state, prevent injuries, and speed up your post-workout recovery.
With this post, I hopefully cleared up everything there is to clear up about foam rolling!
I only have one last tip, for those of you who have suffered injuries or physical trauma and are looking at foam rolling as a possible solution;
No matter how powerful and effective foam rolling is, you should first ask your doctor or physical therapist on how you should approach it.


